Camper Van Conversion: DIY Framing
The frame is the skeletal structure of your van build.
Planning out exactly how you want to arrange these bones can feel pretty daunting at first. You may already have an in-depth plan for your van layout, or perhaps you’re still considering some of the finer details. Either way, this write-up is here to set you up for success with framing.
Cabinets, closet, battery box (did you know we specialize in helping folks get off-grid with high-quality, efficient, affordable, solar electrical systems?), bed frame, countertop, windows and vent fans (to name a few) will all need a structurally sound foundation. If you want to stand on your roof to service solar panels, or mount a deck/roof rack, it might be a good idea to add some reinforcement. The depth of your frame members will also determine how much insulation you can shove in the walls. A lot to consider, yes, but this stage of the build sets the precedent for all of the following stages.
Beyond structural design considerations, the biggest factors in determining the outcome of your project will be your approach; mindset, workflow, and degree of effort. What’s the point of half-assing anything? You’re driven to create a highly functional, comfortable and aesthetically pleasing shelter. It’s going to take longer than you expect, it’s going to be more work than you planned, and you’ll likely run into new challenges everyday.
You’ll learn a ton, grow tremendously as a builder, creator and problem solver, and if you full-ass every step of the way, the sense of pride and accomplishment you feel when it comes time to hit the road will be greater than you could have imagined. So let’s get hammerin’!
Materials:
Wood
Pocket screws
Wood glue
90 degree brackets (maybe)
Rivets (maybe)
Liquid Nails adhesive
Tools:
Circular Saw or Miter saw
Drill
Impact Driver
Rivet gun
Pocket screw jig
Jig clamp
Speed square
Framing square
Tape measure
Pencil
Work table or saw horses/plywood
Clamps (2)
Safety glasses
Ear plugs
Disclaimer: All links are associated with my Amazon affiliate account. Basically, that means the cost is the same for you (whether you purchase here or by searching for things yourself), but using my link passes on a small cut of the transaction to help support the website and future projects/tutorials. Any support is greatly appreciated!
Planning
Basic Layout
Before anything else, you’ve gotta pause here to determine the layout you want. Rest assured, if you decide you want to change this down the road, it’s totally possible. There’s no ‘right’ way to do this, but some things you may want to think about include; placement of the bed, countertop, battery bank, water tank, bathroom, and all the ways you’d like to utilize space for storage.
Now make a rough sketch of the interior of your rig. If you’re tech savvy, use the dimensions of your space to create a 3D model, or download and modify a free template from SketchUp.
3D model of my van layout.
and more 3D action from a different angle, created on SketchUp.
Framing Layout
You’ve got a keen idea for how you want your space to function and flow, so now it’s time to design the structure that will make your layout possible. In general, it’s a good idea to find ways to use any metal frame members that already exist in your van.
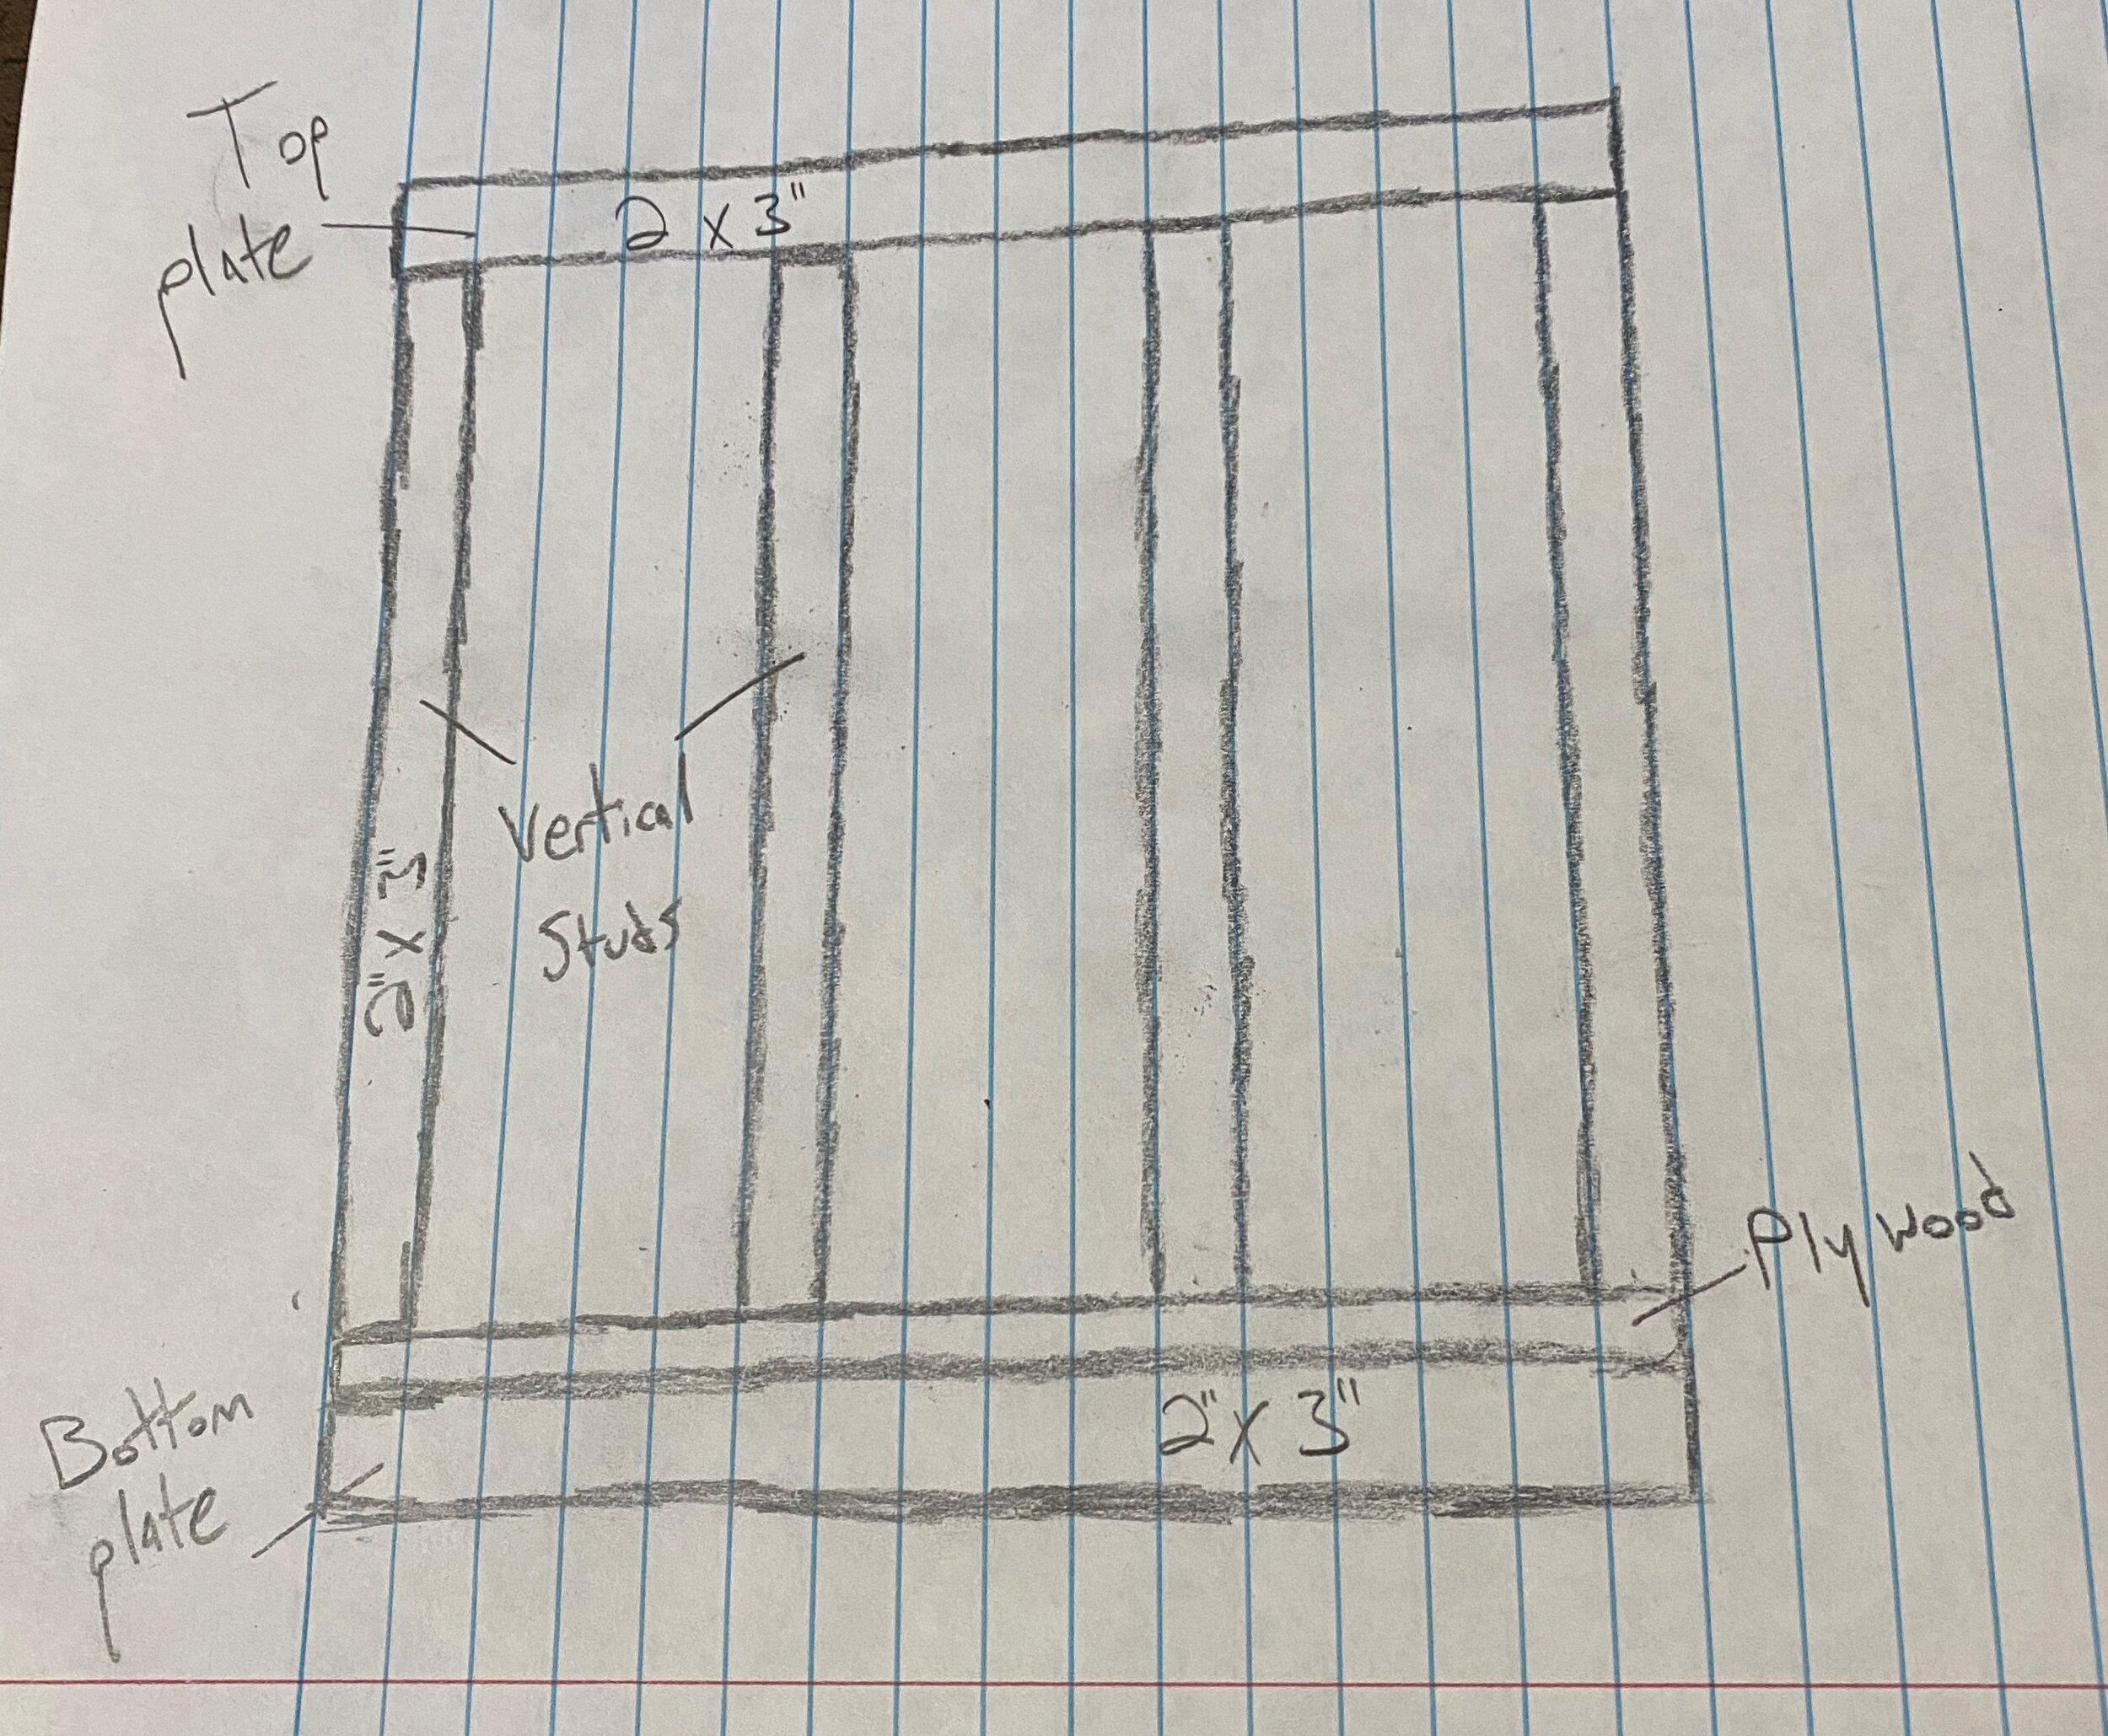
For vertical members, you can place one on the far left/right of each wall, and then fill the space in between as evenly as possible (leaving spaces for windows as needed). Whatever material used to sheet your walls will be screwed into these vertical members, so having them regularly and somewhat evenly spaced will make things easier down the road. The vertical members will ideally tie into a sole plate and a top plate, horizontal studs that run along bottom and top ends of the vertical studs.
Since I already had 2x3s mounted around the perimeter of my floor for the subfloor, I chose to join the vertical studs straight to and through the plywood subfloor into these 2x3s.

Check-out this write-up for more info related to sub-floor framing/installation
The height of any additional horizontal members was determined by the height I wanted for my bed frame, countertop, windows and overhead cabinetry. If you want to raise a wall for a bathroom or closet, additional studs will be needed. Likewise, if you want to mount a wood stove, inverter, or anything else with some substantial weight to it, include the studs that will support these into your design.
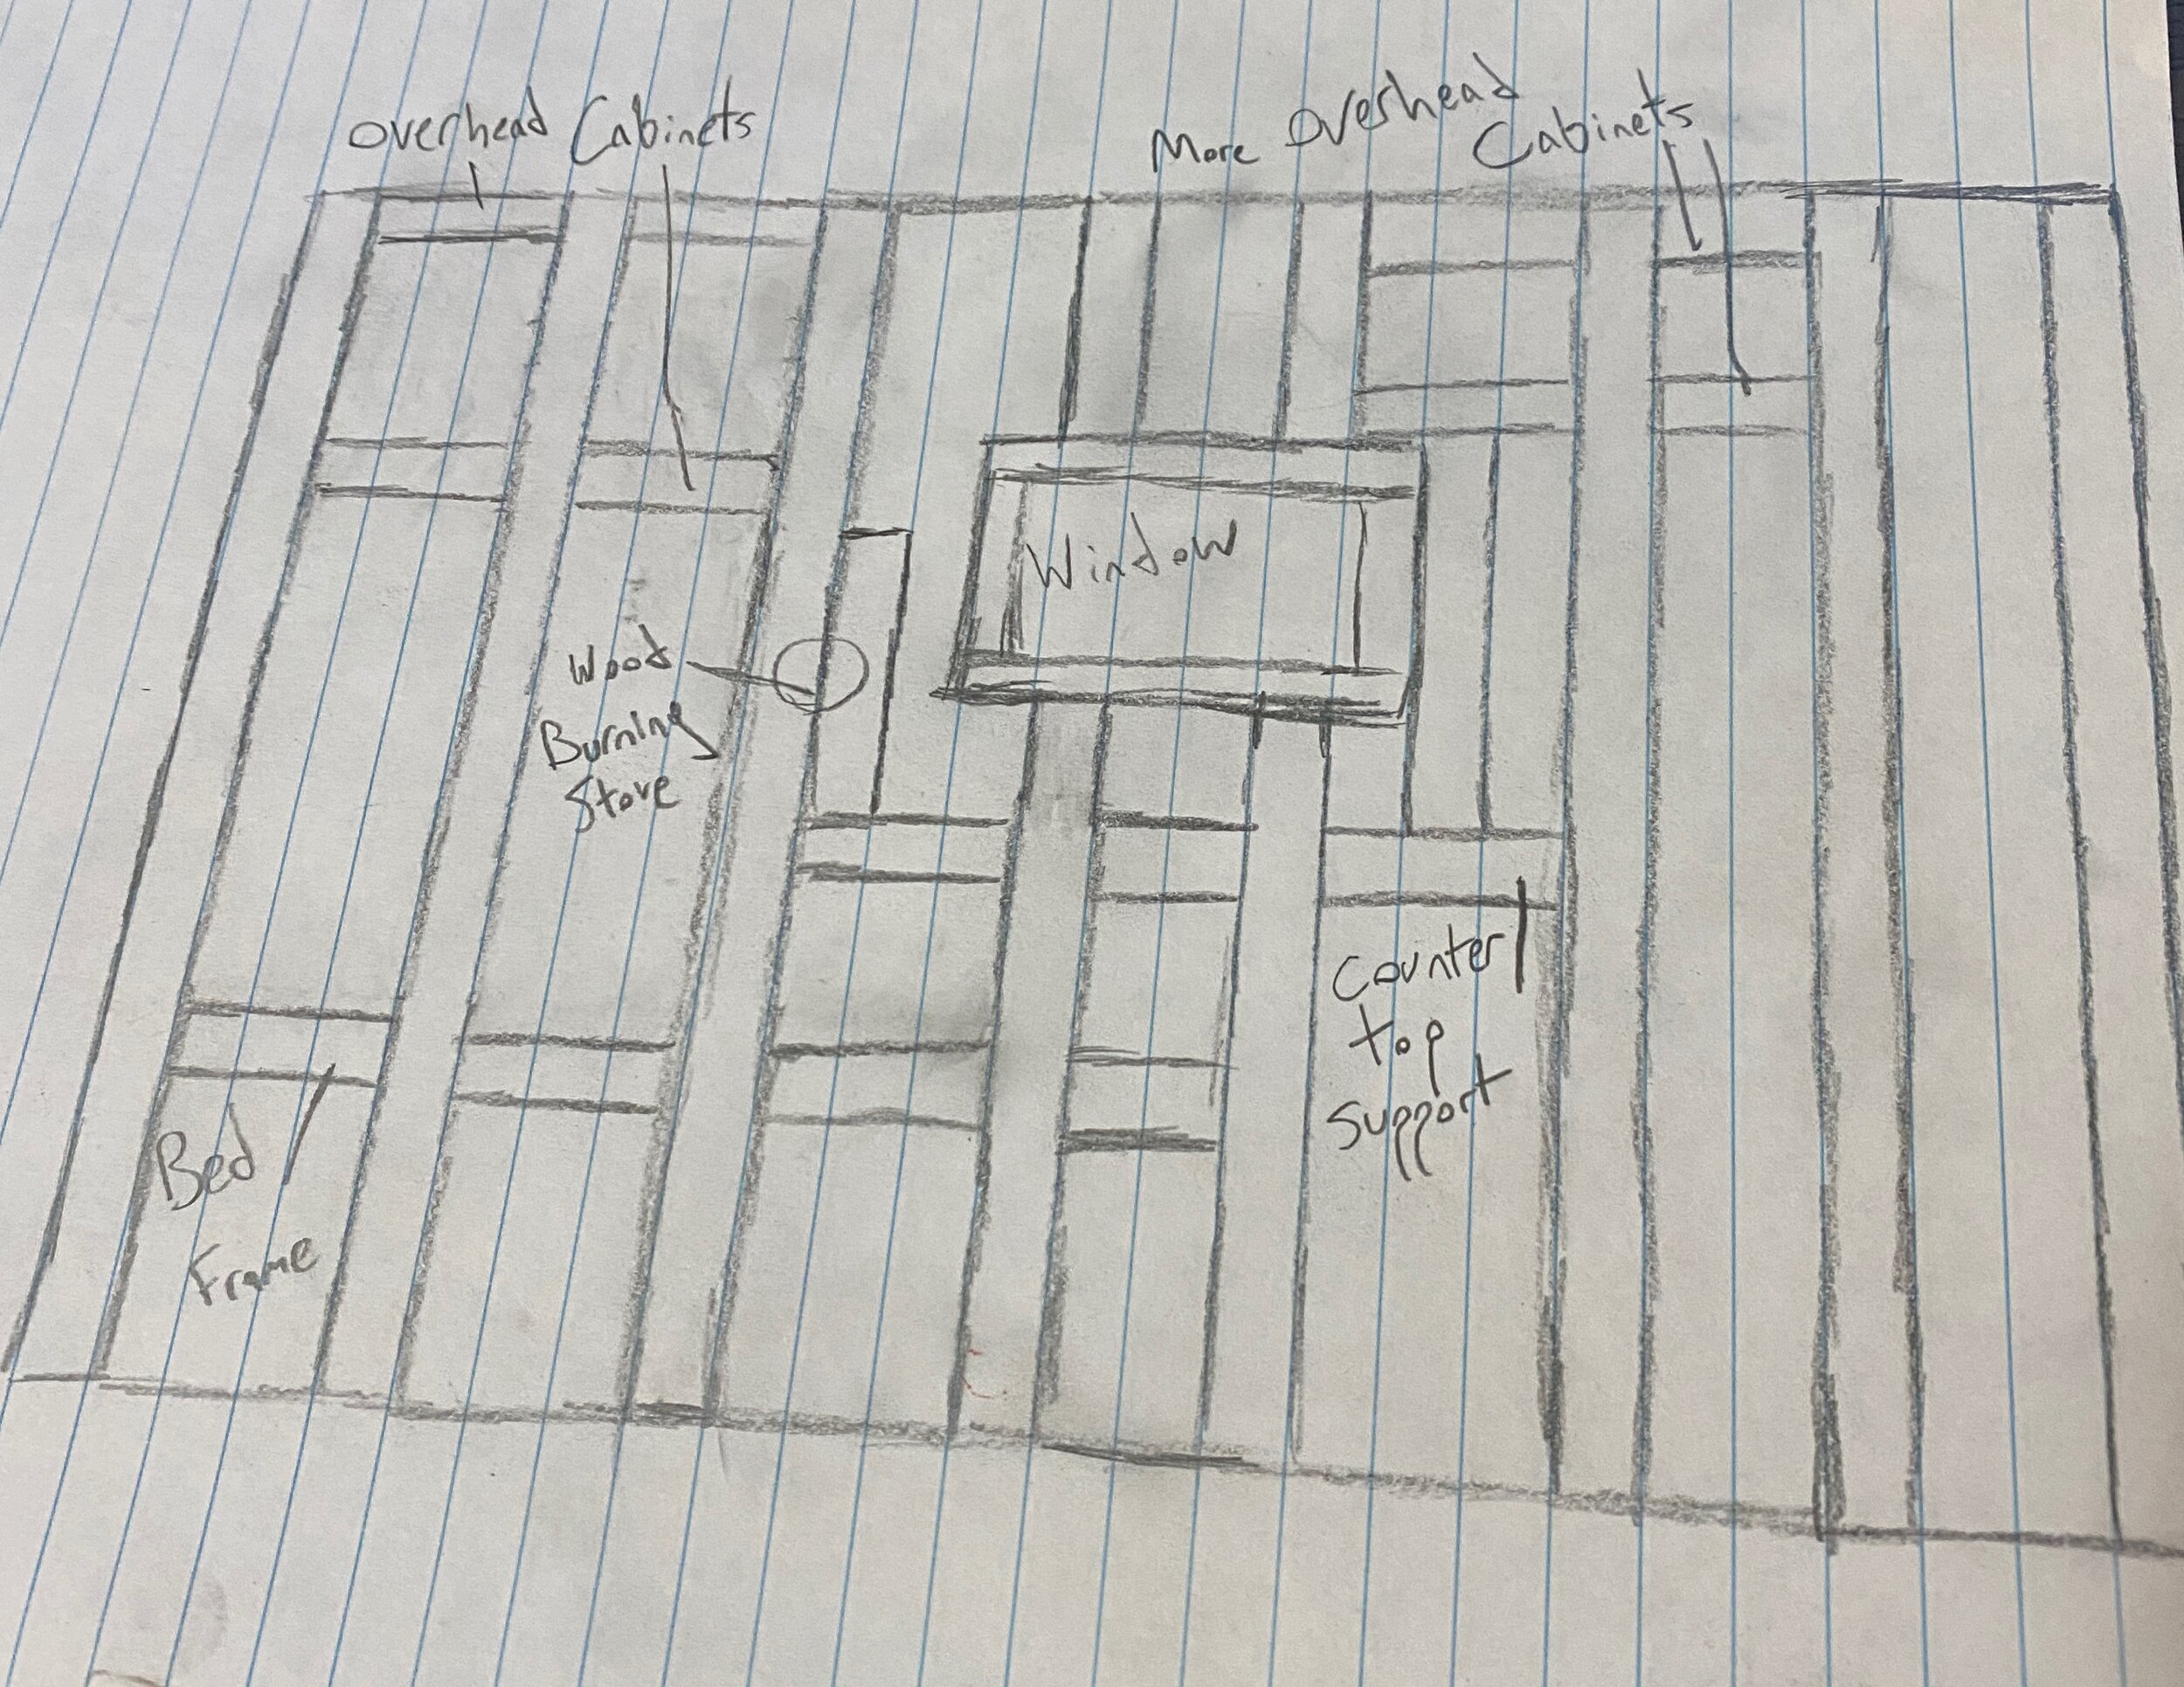
A sketch of the framing on my driver’s side wall.
Roof Support
Mounting solar panels, vent fans, a roof rack or a deck? You might want to reinforce your roof. Besides adding to the structural integrity of the roof, this framing will provide a means to securely mount whatever you want outside on the roof, and inside on the ceiling. My cedar T&G ceiling is screwed into the overhead framing, as are multiple cabinets and the range hood above my cooktop. Here are a few pictures showing how I went about framing my roof.
Roof framing sans bracing
Roof support member secured to top plate
Bracing for roof support
Click on image for close-up of bracing
Windows
Windows require a certain thickness between the exterior and interior trim ring. In order to achieve this, you add up the combined depth of your frame member, vehicle sidewall and interior sheeting. My windows required 2 inches, so I used 2 x 3 for the framing (1.5”), overlaid this with 15/32” plywood, and finished it with .040 aluminum.
Framing around where the window will be cut out.
A Note on Insulation
The thickness of wood used for framing will determine the thickness of insulation that can be used. For example, if using 1” x 2” furring strips (actual thickness .75”), you’ll only be able to fit ¾” insulation into your walls. For my walls, I stacked 2” x 3” studs (actual thickness 1.5”) on top of the original aluminum framing (2” deep). This gave me 3.5” of space in the walls, and I stuffed every bit of it with Rockwool R-15. For the roof supports, I ran 2” x 4” studs on the vertical plane (actual depth 3.5”). Again, packed in the Rockwool!
There’s always a tradeoff, so if you want more insulation, you’ll have to sacrifice a little space and add a bit of weight to accommodate a deeper wall cavity. Having thick insulation isn’t the only way to get a high r-value, but be prepared to pay a premium for thinner alternatives (ie. Thinsulate, spray foam). In any case, comparing the pros and cons of different types of insulation goes beyond the scope of this write-up. The point is, before pulling the trigger on framing, it’s a good idea to consider insulation.
Van Framing Basics
Purchasing Wood
If you take a trip to the big box store and load your cart with the first 10 studs on the shelf, you might run into trouble down the line. Not all lumber is created (or stored) equally. Twisted and warped wood isn’t the end of the world, but taking a little time to examine your material prior to purchase will make it that much easier to keep things square (more on this later).
Take a moment to look down the length of the board, the straighter the better. Less knots in your wood is a bonus. Oftentimes, if I need 5 studs, I’ll end up looking at 10 or so in order to get the most for my money.
Warped wood at the local big box store.
Straight wood from the same pile.
I prefer heat-treated, kiln dried wood for my interior framing projects. The process of drying lumber in a kiln removes excess moisture from the wood. You never want to build with green (or wet) lumber, because the dimensions of this wet wood will change as it dries. This can lead to warpage, cracking or total structural failure (sounds scary? It is).
Heat treatment takes it a step further, and is actually a form of pasteurization. This process affects the composition of the wood in a way that makes it resistant to moisture (think humidity, or an unexpected leak in your rig). Moisture resistance will ultimately extend the life of your wood by shielding it from mold, mildew and rot.
Cutting Wood
Obviously, each framing member will need to be a certain length. Take your time measuring, or you’ll end up wasting money and material.
Let’s say you’re cutting a horizontal stud to fit between two vertical studs. Your goal is to make the cut so accurate that you’re able to press fit the horizontal stud in place (when you let go, it doesn’t fall). This takes practice, and you probably won’t achieve it every time. The closer you get to this gold standard, the stronger your structure is going to be.
A miter saw makes for easy work when it comes to cutting your studs to size. I didn’t have a miter saw, so I used a circular saw instead. Mark the place you want to cut as precisely as possible, and draw an X on the scrap side. If working with a circular saw, use a speed square to turn your mark into a straight line.
Close your eyes and hope for the best. JK, but seriously, wear safety glasses and ear pro. Instead of cutting right down the center of your line, position your blade to cut on the scrap side of the line for greater accuracy. Clamp down your material and go get 'em!
Joining Wood
Wood to metal
You’ve got your studs cut to size, and now it’s time to deliver them to their new home. As mentioned earlier, it’s a good idea to mount wood studs directly on top of any metal framing in your van.
Of course, not all of the wood studs will be attached to metal framing, since you likely won’t have metal framing everywhere you want wood framing. Think of the studs that mount to the existing metal frame as powerhouse studs. These will make up a very solid foundation for you to build off as you construct the rest of your framing layout.
Here’s the step by step:
Apply a modest amount of Liquid Nails adhesive, in a zig-zag pattern, to the back side of wood stud.
Place wood stud in position over the metal frame member.
Use a framing square to ensure stud is square to the floor.
Pre-drill through the center of wood & metal stud with appropriate size drill bit
Drive ‘multi-material’ screw through wood and metal until screw head is sunk ~⅛ - ¼” into wood.
Check to ensure there is no gap between metal and wood. You should see adhesive squeezed out along the edges.
Repeat steps 3-5 until the entire wood stud is securely fastened to the metal frame (I spaced screws approximately 3’ apart).
Liquid nails
Multi-material screw
Wood-to-metal joined
You may have to add framing in areas where you don’t have metal studs or don’t want to use screws (the partition or pocket door walls, for example). In situations like this, I used 90 degree brackets with rivets to secure the studs to the existing metal walls.
Wood to wood
When it comes to joining wood frame studs together, the Kreg Jig is king! This kit comes with everything you need. Basically;
Clamp the lil jig onto the end of stud
Drill through each pilot hole
Add a bit of wood glue to the end of stud
Position stud, make sure it’s square/level and drive your pocket screws through the pilot holes and into the stud you’re joining to.
Keepin It Level, Square, Plumb And True
If you need a refresher for what these 4 pillars of framing represent, check out this short and straight-forward article.

A few related tips:
While a speed square is great in many applications, you’ll want a framing square when installing studs. With long lengths of wood, it’s possible that your board will be square with the ground for the first 7 inches and then deviate further up the wall. Instead of 7 inches (the length of an average speed square), a framing square measures 2 feet and will give you a much more accurate assessment.
When placing horizontal studs, use a tape measure to mark each vertical stud from a common location (such as the ground). Use these marks when joining the horizontal stud to ensure it is level. You can also use a 48” level to double check your work, though make sure the truck is level before trying to level anything within.
Floating studs that don’t connect directly to the van side wall (for a bathroom or closet), need to be true across two planes before installing (think front-to-back and side-to-side). I found it helpful to use a plumb bob in these scenarios, in combination with a tape measure.
Final Thoughts
While we aim to full-ass every aspect of our project, we try not to get too caught up with the idea of perfection. Finding a balance between doing your best and accepting minor imperfections/blemishes with your work is all part of the process.
Research and planning are your best friends when it comes to avoiding mistakes, but sometimes they’re unavoidable. When mistakes eventually happen, remember that it’s ok, not every step will go as planned. But if the little voice inside is nagging you to correct or re-do something, just listen, re-attack and learn from the experience.
How’d your framing project go? What’d you do differently, and what advice would you share with a friend undertaking a similar project? Comment below!